
Create a Home Lab to Learn Kubernetes
Why Learn Kubernetes?
swit As a software engineer focused on low-level implementations, I realized I didn’t fully understand how modern cloud systems work, or how millions of users can access massive amounts of services without interruption. What fascinates me most is the elasticity of resource allocation.
Think about Netflix: every evening, millions of people connect at the same time to watch their favorite series. This creates a huge traffic peak. Yet, everything runs smoothly without downtime.
How is this possible? Answer: Kubernetes.
Why a Home Lab?
I’ve always wanted to have my own server, with my own domain name, to host a personal site. But I never really took the time to make it happen.
When it comes to learning a completely new technology, the best way is to practice, practice, and practice. You can watch every tutorial in the world, but if you never get your hands dirty by writing code and experimenting, you’ll never truly understand how the tools work, how to configure them, debug them, and find solutions when something breaks.
Hardware
I needed a machine with enough RAM to run multiple services, a decent GPU so I could eventually build my own “mini Netflix,” and something small and quiet.
After some research, I chose the Nipogi E3B with 16 GB of RAM. At less than 300 €, it felt like a perfect starting point. If needed, I can upgrade later—adding more RAM and up to 2 TB of storage.
Software
To build a Kubernetes cluster, you need multiple machines. A single bare-metal server is not enough if you want to simulate a real-world production-like setup.
The solution is to run a hypervisor on the server, allowing the creation of several virtual machines (VMs). With this, I can build a realistic environment with multiple nodes.
I chose Proxmox to run and manage all my VMs, as well as handle the internal networking. It’s one of the most common ways to set up a home lab. On top of that, Proxmox runs on Linux, which is great practice if you want to dive deeper into Kubernetes.
Architecture
My main personal computer is a MacBook Air M2 with 256 GB of storage. It’s fast, but very limited in memory, and it was already full. That’s why I needed to design my home lab so that everything—my tools and my systems—lives on the dedicated server.
I also decided not to run services directly on the Proxmox host system. Instead, my first VM is an Ubuntu LTS server, which I use to install all the necessary tools to create and manage my Kubernetes cluster.
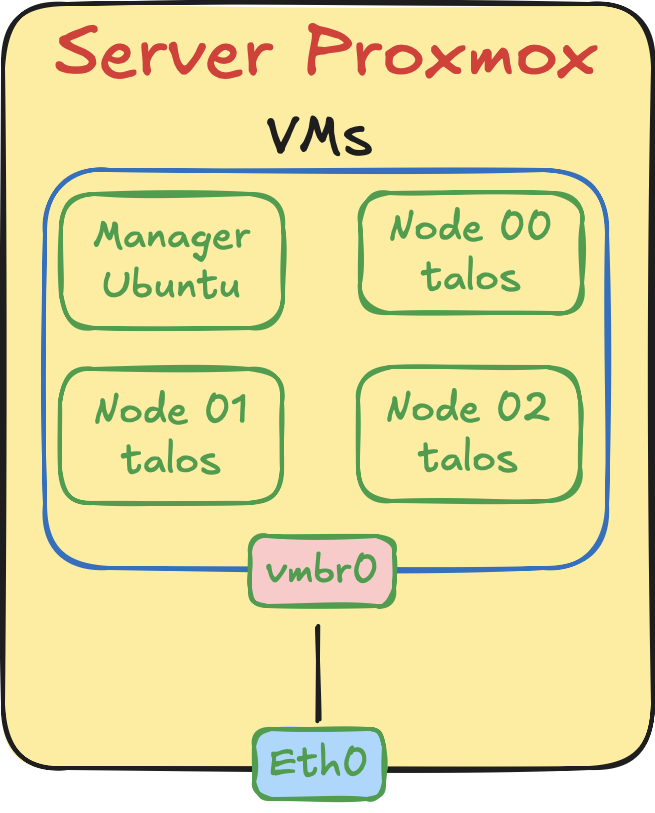
For the Kubernetes nodes themselves, I use Talos Linux, a lightweight, secure, and Kubernetes-focused OS.